This guide provides administrators and program coordinators with a structured, step-by-step roadmap to implement and launch the Business Continuity Management (BCM) module in C2Risk. Whether you are migrating from spreadsheet-based templates or building your business continuity program from scratch.
BCM Implementation Overview
The C1Risk BCM module operates as a unified three-part resilience framework:
- Business Impact Analysis (BIA): Quantifies operational, financial, and reputational risk to identify critical processes.
- BCM Dependencies: Maps upstream and downstream assets, vendors, systems, and resource requirements.
- BCM Plans: Outlines actionable recovery strategies linked directly to your BIAs.
Deploying this module successfully is divided into four key setup phases:
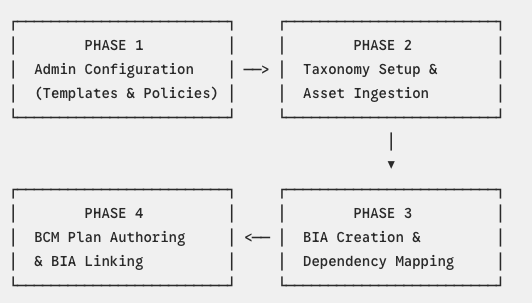
Phase 1: Administrative Configuration
Before importing data or inviting stakeholders, GRC administrators must establish global scoring rules, validation criteria, and templates. This ensures structural consistency across all records.
1. Customize the BIA Evaluation Template
Design the quantitative criteria that business unit owners will use to score potential disruptions.
- Navigate to Administration > BIA Template.
- Use the Impact Categories and Threat Categories tabs to add, rename, or sort the sections and categories that fit your industry.
- System Guardrail: The template must contain at least one active section for both Impact and Threat, and each section must contain at least one active assessment category. Section names must be unique across the template.
2. Configure Downtime Dropdowns (Custom Fields)
Align the system's dropdown recovery intervals with your corporate continuity definitions.
- Navigate to Administration > Custom Fields.
- Select the dropdown parameters for Maximum Tolerable Downtime (MTD), Recovery Time Objective (RTO), and Recovery Point Objective (RPO).
- Open the Edit List configuration to modify the time steps (e.g., 0 Hours, 2 Hours, 4 Hours, 8 Hours, 24 Hours, 48 Hours, 5 Days, 1 Month+).
- System Guardrail: The platform enforces anti-error rules. You cannot save duplicate values, and you must select at least one active value to prevent saving empty lists.
3. Establish the Criticality Risk Policy
Automate how C1Risk determines criticality based on assessment results.
- Navigate to Administration > Risk Policies.
- Find the system-locked policy named Criticality (Object Policy:
BIA). - Define your qualitative criticality bands (e.g., mapping an Impact Score of 90–100% to Critical, 70–89% to High, and so on).
- This rule dynamically resolves and updates the read-only criticality badge on BIA records upon save, removing manual guesswork from the user experience.
Phase 2: Building Your Operational Taxonomy
To map dependencies and link continuity plans, your underlying corporate taxonomy must exist within the GRC platform.
1. Ingest Department and Process Assets
Capture the organizational units and operational functions being analyzed.
- Navigate to Enterprise Management > Assets.
- Select Add Asset to create or import records representing your internal business units (e.g., Finance, IT, Human Resources) and specific operational processes (e.g., Accounts Payable, Treasury, Payroll).
- Be sure to configure specific Asset Types (such as Department, Function, Process) to classify your inventory correctly.
2. Ingest Application and Infrastructure Assets
- Go to Enterprise Management > Assets and add records for your hosting services, databases, and critical systems (e.g., ERP Database, AWS Cloud, Active Directory), setting their Asset Type to Applications.
3. Register Vendor Profiles
- Navigate to Vendor Management > Vendors and add external service providers or SaaS vendors that your internal processes depend on to function.
4. Catalog Vital Records
- Under Enterprise Management > Assets, define key digital or physical record sets (e.g., Employee Tax Forms, Customer Contracts) with the Asset Type set to Vital Records.
Phase 3: BIA Creation & Dependency Mapping
With the administrative framework and taxonomy in place, designate and assign assessments to your Process Owners.
1. Add BIA Records and Assign Owners
- Navigate to Business Continuity Management > BIA and click + Add New.
- Fill out the name (e.g., Accounts Payable Operational BIA), select the target Enterprise Asset from your taxonomy, and assign the Primary Contact (the business process owner).
- Click Save to generate a unique record ID prefixed with
BIA-.
2. Perform Quantitative Assessments
- Scroll down to Impact Categories and Threat Categories.
- Instruct the Process Owner to score each category card from N/A (0) up to Critical (100).
- Bulk Actions: Owners can select multiple category checkboxes within a section and click Bulk Operation to apply a rating level simultaneously, saving clicks.
- Zero-Exclusion Score: The system calculates the average score by completely excluding N/A selections from the divisor, ensuring realistic metric representations.
3. Define Recovery Objectives & Gaps
- Under the Risk Response section, select target intervals for MTD, RTO, and RPO.
- Conduct a gap check: If current recovery capabilities cannot realistically meet the defined targets, set the Gap dropdown to Yes and document the root causes in the Gap Analysis text field.
4. Map Upstream/Downstream Dependencies
- On the saved BIA detail page, click the Dependencies subtab and select Add New BCM Dependency.
- Set the Dependency Flow (Upstream if the BIA relies on the resource, Downstream if the resource relies on the BIA asset).
- Select the Dependency Type (e.g., Applications, Vendors, Vital Records, Equipment). The form fields dynamically update depending on your selection to capture specialized parameters (e.g., application Work Recovery Time, or vendor SLA details).
- Mutual Exclusion Rule: C2Risk strictly blocks you from selecting the same asset as both the BIA host asset and its dependency asset to prevent invalid circular dependency chains.
Phase 4: BCM Plan Authoring & BIA Linking
The final phase ties your risk assessments and dependencies to actionable recovery, disaster recovery, or crisis management protocols managed by Plan Owners.
1. Create BCM Plan Records
- Navigate to Business Continuity Management > BCM Plans and click + Add New.
- Input a plan name (e.g., Finance Department Continuity & Recovery Plan), choose the Plan Type (e.g., BCP, DRP, CMP, ERP), and assign the Primary Contact (Plan Owner).
2. Upload Recovery Content
- Populate the plan by drafting the recovery procedures directly in the rich-text Content editor, uploading a primary plan file in the Attachment component, or linking to a secure external repository in the URL field.
- Submission Guardrail: If "Approval Required" is checked, the platform prohibits empty plan submissions. GRC enforces that at least one of these content attributes (Content text, Attachment, or URL) must be populated before a plan can transition to a pending review state.
3. Establish the 1-to-Many Linking Model
- Under the Attributes panel of the BCM Plan record, search for and link all relevant BIA records covered under this plan.
- Strategy Best Practice: C1Risk supports a many-to-many lookup structure. To reduce procedural overhead, link multiple specific BIAs (e.g., Accounts Payable BIA, Treasury BIA, and Payroll BIA) to a single departmental BCM Plan (Finance Plan).
Phase 5: Continuous Maintenance & Reporting
Maintaining business continuity is an iterative process. Keep your program healthy using the platform's lifecycle tools:
1. Establish Structured Review Cycles
- Set a Review Frequency on BIA and BCM Plan records.
- GRC automatically computes the Next Review Date and sends automated email notifications and escalations to primary contacts when updates are due.
2. Export Executive BIA Workbooks
- To share assessment summaries with executives or auditors offline, navigate to any BCM Plan detail page, open the top-right Action Menu, and select Export BIA Workbook.
- The platform dynamically compiles and formats all linked BIA records, downtime metrics, gap analyses, and dependency maps into a professional multi-tab spreadsheet.
Was this article helpful?
That’s Great!
Thank you for your feedback
Sorry! We couldn't be helpful
Thank you for your feedback
Feedback sent
We appreciate your effort and will try to fix the article